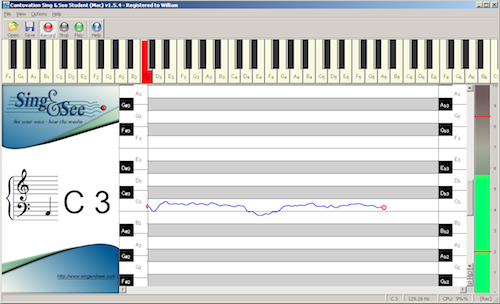
Welcome back! Last lesson we got you started on Sing & See – a program that allows you to visualize what you’re singing. We’ve found that this tool helps singers really see their voice’s strengths and weaknesses – helping them learn at a faster rate.
Most singers will attest to the fact that there are two things that make them improve their singing: lots of practice, and being able to get good feedback about their performance. Just like with any other instrument, focused practice will reap benefits.
Sing & See helps with this because it gives real time and precise feedback. You can use Sing & See to experiment with different techniques and exercises so you can get the very best out of your voice.
The great thing about the feedback that Sing & See gives is that it is shown to you on clear and direct displays. Humans are very good at seeing visual patterns so it is very easy to see just what your voice is doing as you sing. So if for example you’re struggling to stay in pitch, it will help guide you to getting on pitch more often. And if you’ve never quite been sure whether you’re on pitch or not, it may help instil you with confidence. And when you’re fine with your pitching, there are more advanced displays showing other aspects of your voice (we cover these later on).
Take your next steps
In this lesson you will learn about the basic toolbar controls of Sing & See and some simple exercises to check your ability to match notes. We’ll tackle the following:
- More detailed instructions on operation, including how to record / sing / play, and how to use keyboard shortcuts
- Simple pitch exercises – match a note: play it, sing it, listen to it, and read the display
At the end of the session, we recommend you save all your exercises. This will allow you to keep track of your progress over the next couple of weeks.
Let’s start singing!
- Run Sing & See. If you installed it according to Lesson 1, it should start up on its own. If you have trouble, you could try re-starting your computer. If that still doesn’t work, try carefully re-installing it. Please contact us if you’re having a lot of trouble and we’ll do whatever we can to get you up and running!
- Make sure your microphone is plugged in and ready to go.
When you’re read to sing, click on the “record” button.
Note matching
- For the first part of this exercise, we’re going to repeat the simple note matching exercise from yesterday. Click on the keyboard to hear a note, then sing into the microphone and observe that you match it.If you’re not getting it then experiment a bit with your voice, adjusting your pitch higher or lower. You will see the Pitch Line going up and down as you sing higher and lower in pitch. A red or yellow line on the display marks the exact centre of the note.

Now let’s do that again. Click on “stop”. Then click “record” again to restart the recording.
- Play the note again, and listen carefully to the pitch. Try to imagine the note in your mind. Then sing the note you imagine. If you’re not exactly on pitch, try again.
- Now, click on the “play” button. You will be able to listen to yourself singing. Watch the line and listen to your singing, then click on the piano key and listen to the actual note.
If you’re having trouble staying on pitch, you might like to check with your teacher about how you can correct things like your breathing and posture – they can both have a big effect on pitch. In fact, even what you eat and drink (and things like medication/ drugs and smoking) can have an impact on your voice.
Please note that Sing & See is best used in conjunction with a professional singing teacher, who can teach you how to improve aspects of your voice – though using Sing & See on your own will still get results!
Handy hints
1. Using keyboard shortcuts
Two quick shortcuts:
- Use the Space bar to play
- Use the Enter key to record.
2. Saving your recordings
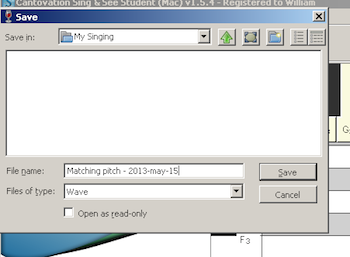
It might be a good idea to set up a file of your recordings, so you can measure your progress. Best to save your first file with a descriptive filename, perhaps something like “Matching pitch – 2013-may-15”. Using the date in the filename will help keep track of when you sung this recording.

That’s it for today. Practice singing a few more notes to sharpen up your performance. The best thing you can do to improve your voice is to keep on practicing.
Happy singing!


Is there a way to add in music or a recorded song (cd or something) to listen to while singing along. Idealy having a Karaoke song playing and singing along with it would be best. I am able to play a song at the same time on the computer but it is in a different program so it is not controlled by Sing & See and therefor hitting play on one and record on Sing & See and then stop on both is a bit of a pain. And then there is no music behind the vocals in the recording.
It’s probably going to a completely different level than Sing & See was designed for,,,, but if it is possible it would be nice.
Hi Gene,
Yes this would be good, but the current version of Sing & See doesn’t yet do it. As you suggest, you can have your music playing in another application in the background.
Hopefully we’ll have something like this in a future version – but probably it won’t be reinventing a full music media player…
Try using a headphone.
Hi,
I have been monitoring my singing using Sing & See, at the high end of my range (around F5), I see spikes/transients that go up to F6 and higher, could you please explain what these are and how they are produced.
Thanks,
Martin
With reference to the preceding email, I have since observed, that the transients occur at all pitches in my range.
Hi Martin,
Transients such as you observe occur when the pitch detection algorithm momentarily makes a gross error in the pitch it detects. There are several possibilities for WHY this might occur – I would need to analyse some recordings to get a better idea of that.
Generally such errors are because of background noise, tones, or music that distorts the sound that is actually recorded. It may be that a different microphone would help. Or, if you have some accompaniment music while you are singing, I would suggest playing that through headphones so it is not picked up by the microphone.
If you wish, feel free to email me some recordings (press “Save” which will save what has been recorded as a “.wav” file which you can attach to an email to support at singandsee.com). and I will investigate more carefully.
Along the lines gene was inquiring about. I would like to request an upgrade that would enable us to sing along with an artist ‘s vocal track and have the See & Sing algorithm “subtract” the difference so that we can see in real time how close we are to the artist we are singing with.
Kind of a nerdy request but people would find it useful
Hi George – thanks for that feedback. It’s good to hear that this is something that more people are keen on having in the software!
Will see what we can do…
This would be cool. I have previously used a simple pitch detector and noted I was consistently sharp on a song. Then I found the isolated vocal of the original singer and they were similarly sharp. That is not to say my pitch is always spot-on but this difference analytics could be helpful.